One of the many uses for Chameleon's in-app messages is to invite users to opt-in for product or feature betas. Besides letting you announce beta tests from inside your product, Chameleon also helps you collect user feedback during testing, thus allowing you to harness user engagement when it's at its peak.
Gathering user feedback during beta testing is a great way to find bugs, improve user experience, and to get to know your users better to predict their potential needs and desires early.
In this recipe, we'll teach you how to use Microsurveys to get valuable and actionable user feedback during product or feature beta trials, along with some best practices for leveraging survey data.
The ingredients for success
A Chameleon account
User properties & events flowing into Chameleon via Segment or our API
Optional: Basic Customer.io account with a campaign branded template (and Customer.io code snipped installed on the pages where Chameleon Experiences display)
Optional: Brand guidelines approved by your designer
Step 1: Establish your target audience
If you're collecting feedback during a closed beta test, you certainly want to be able to target only users who have opted in for it. The first step to building an effective beta survey is to ensure that this user group is being defined via specific user attributes and that the segment is created on Chameleon.
👉 User data like properties or attributes can be imported into Chameleon via our API or integrations with tools like Mixpanel, Amplitude, or Stripe.
To build or identify your segment for your in-product survey, go to the Segments tab from the Dashboard. To create a new segment, click on the ➕ icon, name the new segment, and select the attribute filters that will define your audience - in this case, those will be the identifiers you use to indicate beta users.
If you're beta testing a new product that has different feature offerings for users in different plans, or a feature that has different capabilities depending on plan type or account level, you might want to further segment your Microsurvey audiences.
In this Recipe, we'll target users who are beta testing a new feature and are in a Growth-level plan.
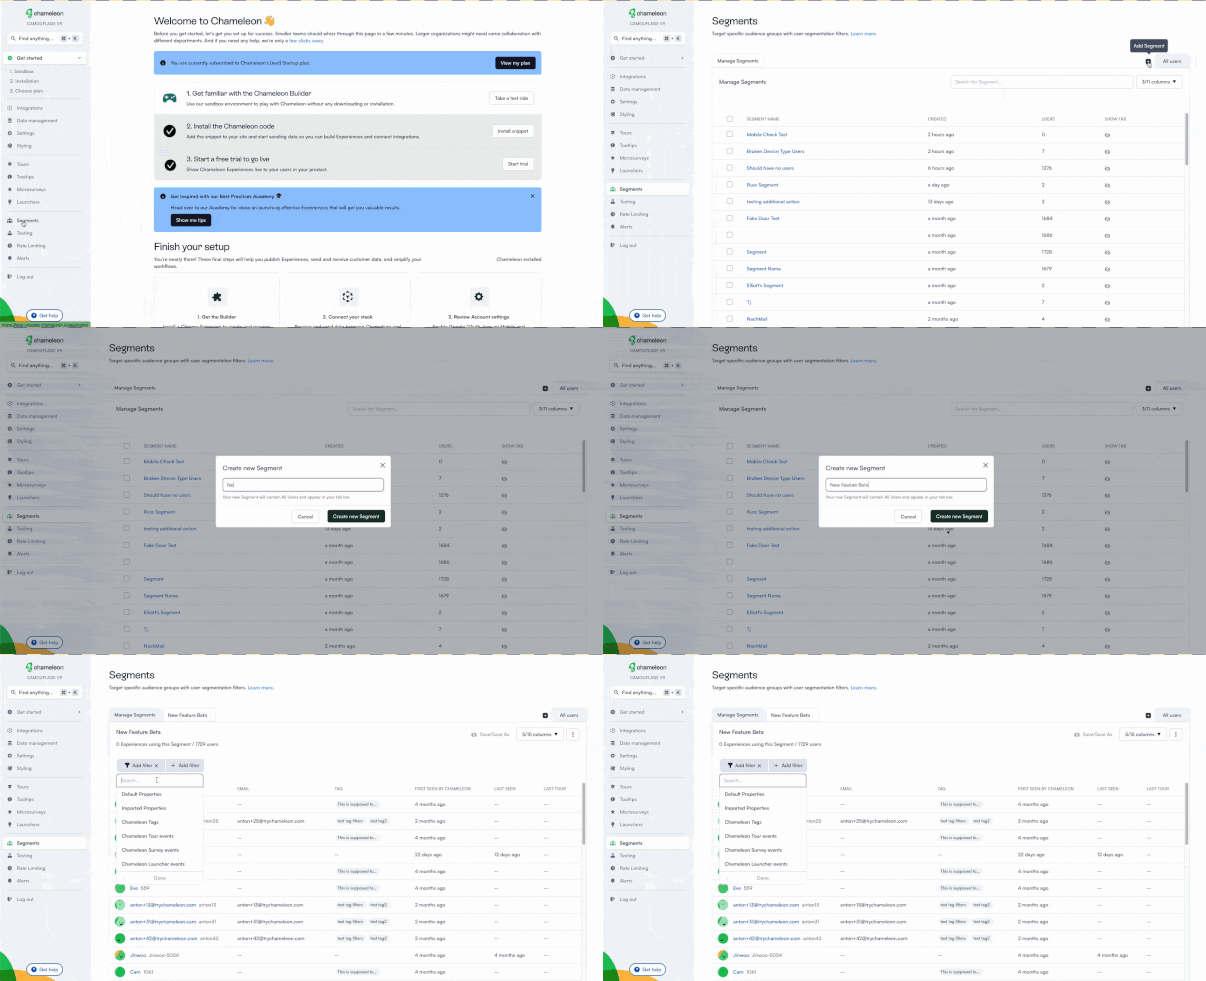
Adding more filters (user attributes or properties) to your user segments ensures that users are answering questions that are most relevant to their experience with the product or feature.
Step 2: Select your Microsurvey Type
The quality of information you collect from users depends entirely on what questions you ask in your survey and how you ask them.
Chameleon offers 5 types of Microsurveys:
- 1 Rating Microsurvey
- 2 Input Microsurvey
- 3 Multi button Microsurvey
- 4 Net Promoter Score (NPS)
- 5 Dropdown Microsurvey
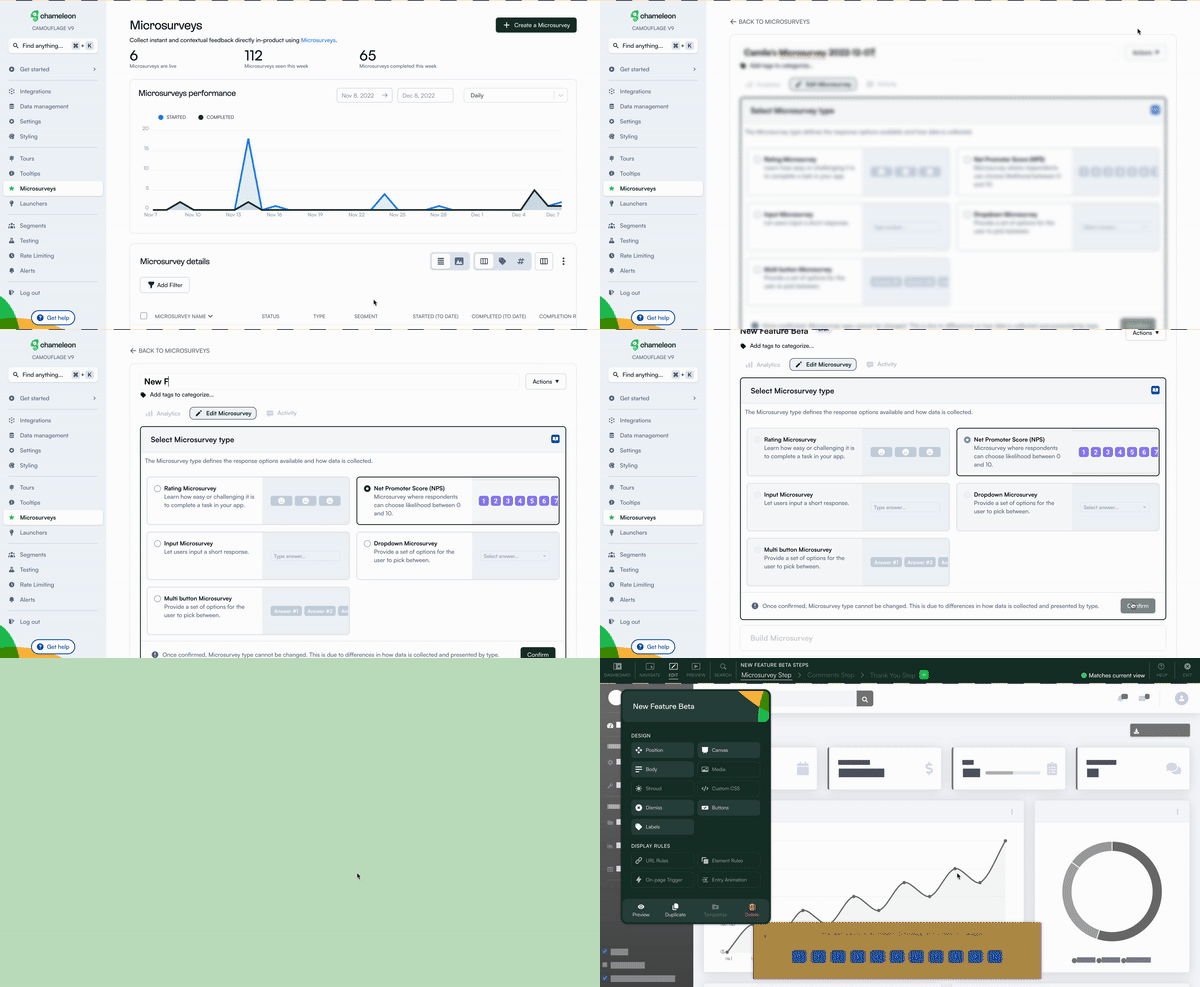
To select your type of Microsurvey, enter the Chameleon Builder and Create a Microsurvey from the Microsurvey tab, you will immediately be prompted to choose from Chameleon's pre-defined options.
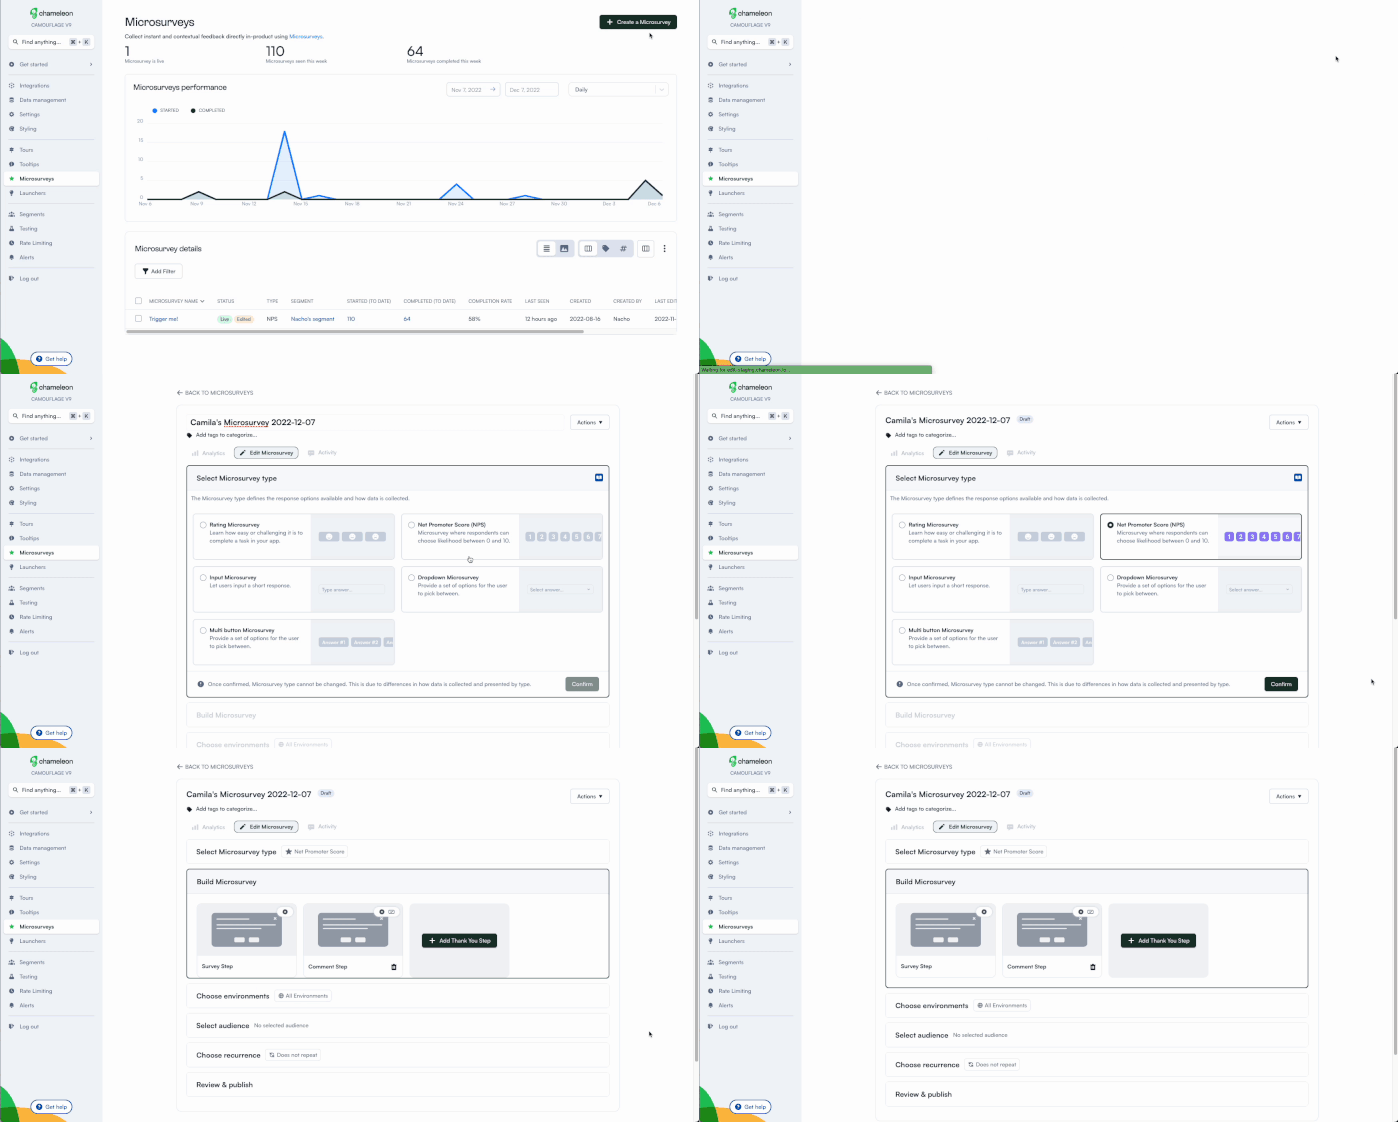
Which type of Microsurvey is right for you?
In order to evaluate what type of Microsurvey works best to collect feedback on this beta test, we'll start by defining what types of answers we are expecting to get.
In a new feature beta, gauging how beta users perceive the new feature can help predict how well it will be adopted when live, which user groups can gain the most from it, and even if it's worth launching.
In this Recipe, we'll use an NPS Microsurvey to measure how likely users are to adopt and recommend the feature being tested.
📖 Case Study: Check out how Degreed gathered feedback on a redesign beta and leveraged results to successfully onboard thousands of users.
Let's explore how the other types of Microsurveys can be used to get user feedback in beta tests:
🙂 Rating Microsurveys
Includes Customer Effort Score (CES) and Customer Satisfaction (CSAT) surveys - with emoji rating, 1-5 rating, and Easy-Difficult or Satisfied-Dissatisfied choices.
💡 Use this type of survey to get a quick measure of how users feel when trying a new feature.
💬 Input Microsurveys
Collect text responses when you need users to provide further detail or information.
💡Use this type of Microsurvey to collect failure feedback (identify bugs and points of friction) asking users why they didn't complete a workflow or take a key action.
⬇️ Drop-down Microsurveys
Add a set of options for your users to pick from, or add their own.
💡 This type of survey is recommended if you want users to elaborate on their choice from the dropdown menu, as around 40% of users are likely to leave a comment after this type of survey.
🔠 Multi-button Microsurveys
Chameleon lets you create multi-button surveys with up to five buttons and trigger specific actions from each (e.g. load a page, update data, start a Tour, etc.)
💡 This type of survey can be used in a product beta to evaluate product-market fit.
If less than 40% of participants respond as Very disappointed to the question "How would you feel if you could no longer use this product?", it would mean that you have not found your product-market fit.
Choosing your type of survey is the first step of the building process on Chameleon and a great place to start setting the right questions. Now let's keep moving forward and start building this survey.
Step 3: Build your Microsurvey
Once you select the type of Microsurvey you want to build, you'll enter the Chameleon Builder where you can deeply configure your questions and survey steps.
Chameleon Microsurveys include up to three steps:
- 1 A Microsurvey Step: a question with response inputs relative to the type of Microsurvey you selected.
- 2 A 'Comments' Step (optional): a follow-up Step, where a user can leave free-form text feedback; can have different variations based on what button was clicked on the previous step.
- 3 A 'Thank you' Step (optional): a thank you message that is briefly displayed.
Using short surveys (or Microsurveys as we like to call them), increases your likelihood of getting users to complete them and offer honest responses (according to our Benchmarks Report, the average completion rate of Microsurveys is 60%).
When you launch the Builder, you're automatically prompted to configure to the first step.
You can make a number of configurations on Chameleon, from cosmetic edits in styling, text formatting, and adding shroud, to setting element or URL rules for displaying the display.
To build our survey that targets beta users in the Growth-level plan, we'll configure the following settings of the Microsurvey Step.
Styling
For a cohesive and native-looking design, we'll style this Microsurvey with Brand Basics like colors and fonts that can be configured on Chameleon for easy editing.
Since we want to make sure that this survey catches users' attention, we'll position it at the center of the page and configure the Dismiss button to snooze the survey for 1 day until the user completes it.
On-page triggers
We want to set the survey to appear after the user performs a certain action, in this case, once they click an icon anchored to the feature that you're beta testing and collecting feedback on. But you can also define other triggers like when users click on a page element, or after a time delay.
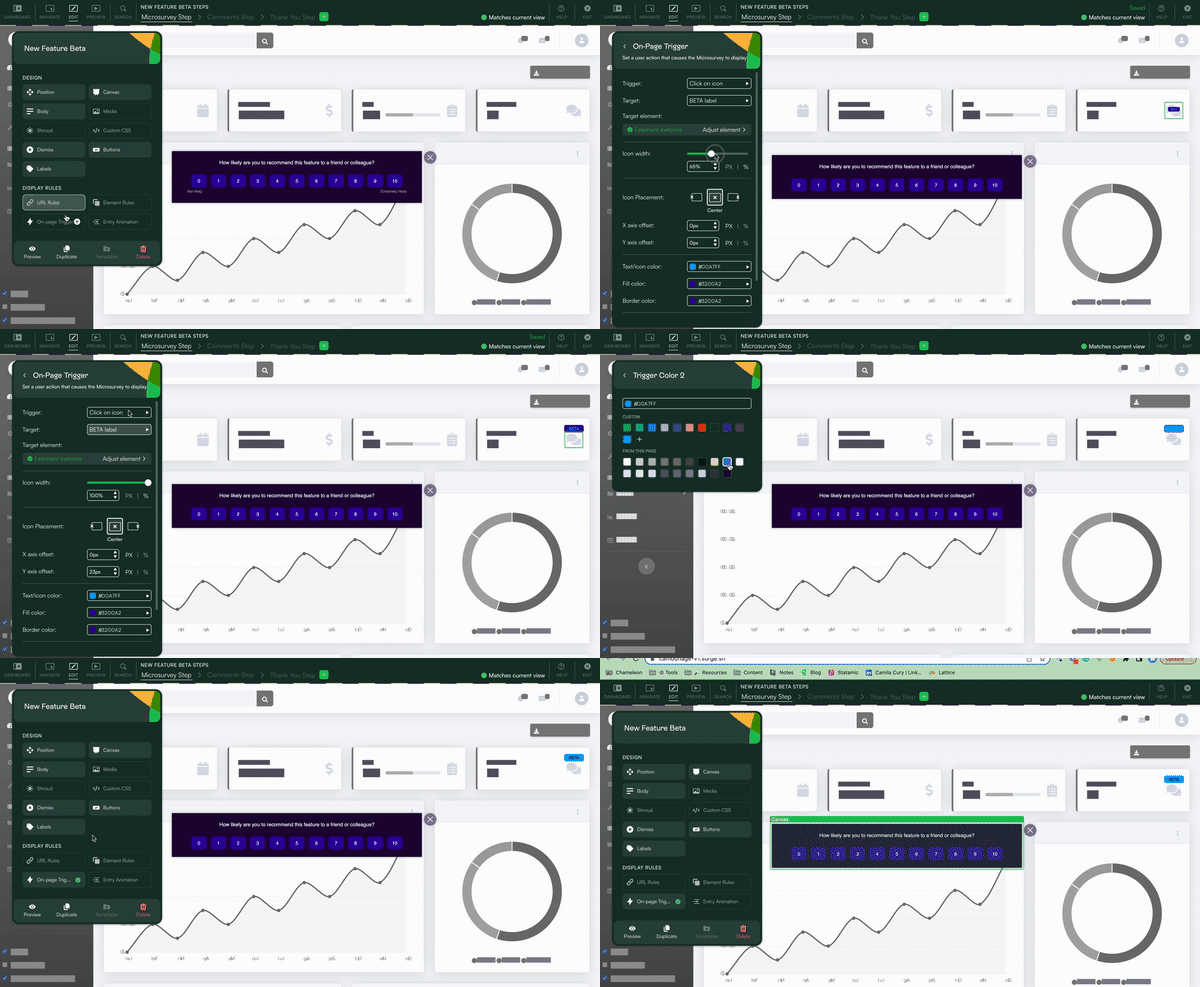
URL and Element Rules
For more advanced configuration, we can also define URL and element display rules to establish other conditions that have to be met for the Microsurvey Step to appear. For example, if a certain element needs to be present on the page before the Microsurvey can appear, we can set that up at this point.
Since the beta feature we're collecting feedback on is only available for users in the trial, we'll establish the rule that the feature element must be present on the page for the survey to appear.
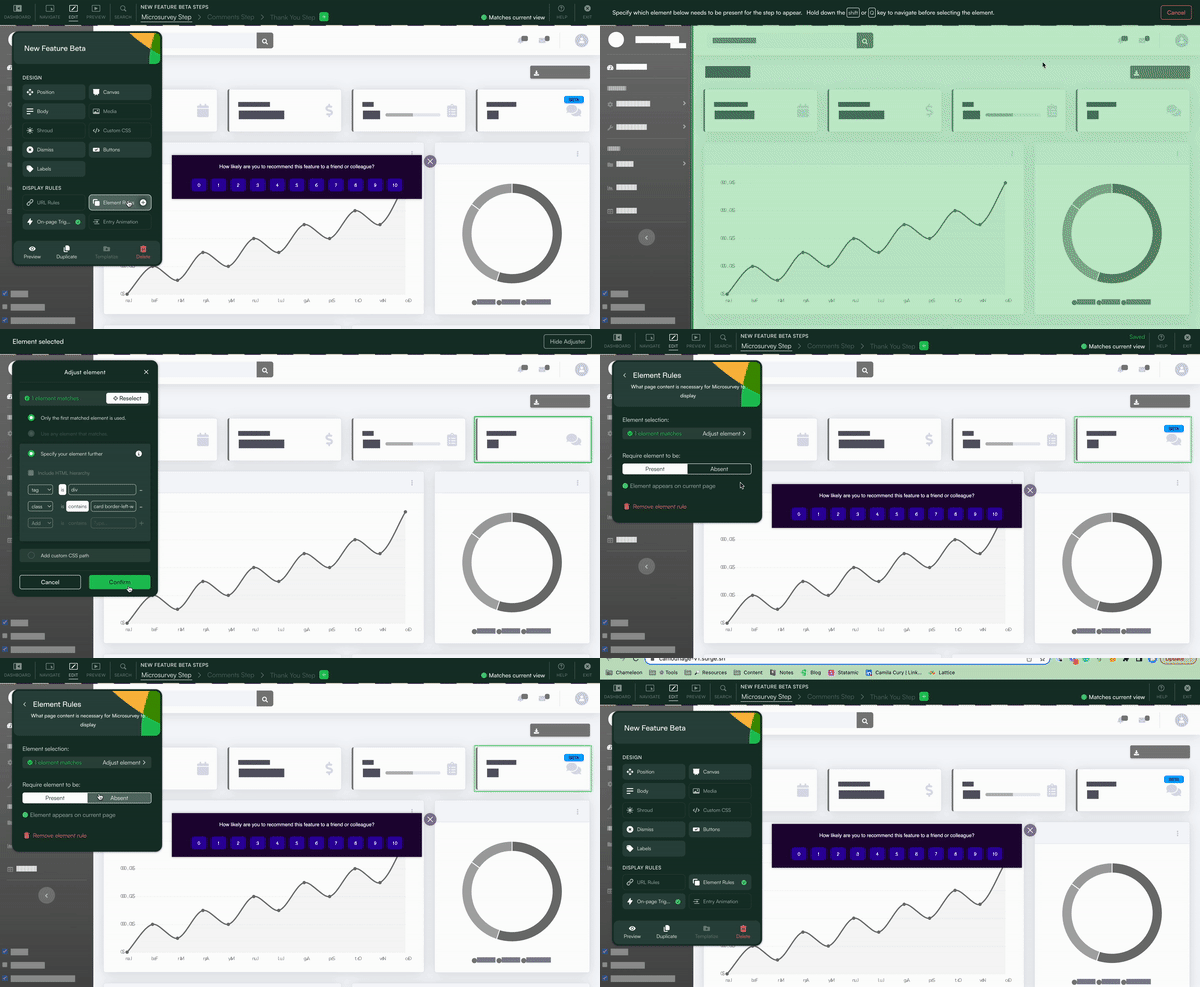
We can now move into the Comments Step. Here, we'll set the question that each button in the previous step will lead to.
Setting Button Actions
Your buttons can also trigger additional actions, like triggering another Chameleon-built Experience, opening a link, or even updating a user property. The latter is particularly useful if you want to create a cohort of the most successful beta users for product-marketing targeting.

Once you've built, customized, and previewed your survey in action, it's time to finalize the steps to publishing your Experience. You can exit the Builder with has automatically saved your Microsurvey design and setting, and move on to the publication steps.
👥 Select Audience: Select the segment you previously identified or created for this survey (you can also create one at this step, directly from the Experience Dashboard).
⏲ Choose Recurrance: You can determine if the survey will repeat after it has been exited or completed.
👀 Review & Publish: Launch your Microsurvey immediately or schedule it for a specific date. You can also set how long it will be live by defining an unpublishing date.
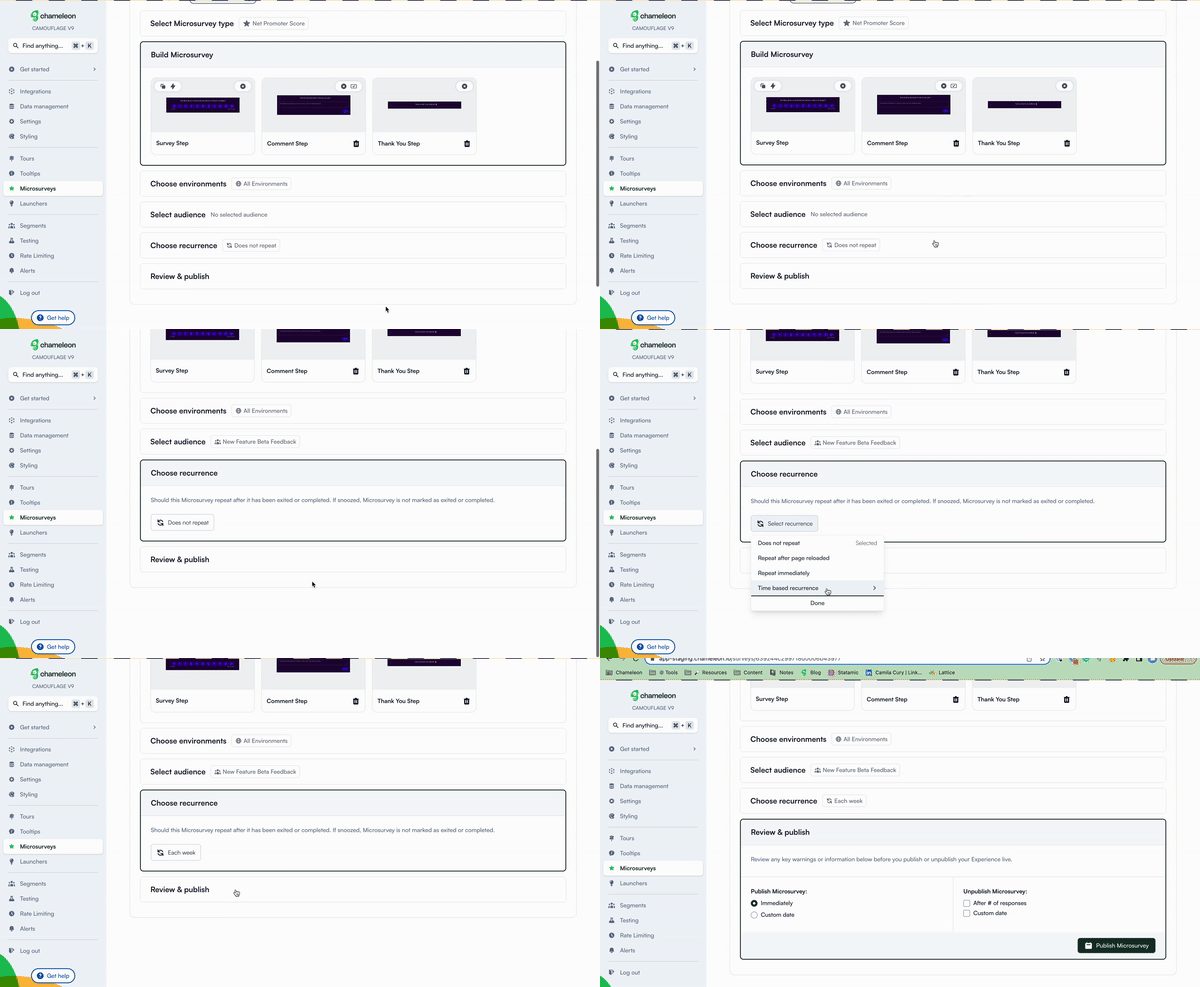
Now your survey is running and the responses can start coming in.
Step 4: Collect and assess user responses
Getting your Microsurvey out the door is only part of the process, the real work comes from analyzing the responses. Chameleon collects these in a few different ways:
Chameleon Dashboard - view the report for each Microsurvey, as well as overall performance.
CSV download (from the Dashboard)
Connected analytics integrations
API (read more here)
Response data includes events (e.g. Chameleon Microsurvey started sent every time a Microsurvey is seen by a user) and properties of events (e.g. button_text which contains the text of the button within a Microsurvey that was clicked by a user).
To evaluate survey performance, you can set and track an event like Chameleon Completed Microsurvey and group by the <button_text> to see how users have responded.
If you have connected Chameleon via Segment, then Chameleon will act as a data source and send this information to Segment and onwards to any other connected integrations.
If you're evaluating responses to draw insights about how users feel about the product or feature, your process will depend on what type of survey was users. For rating and NPS surveys, looking at average scores can already elucidate some conclusions. However, for input surveys and comment steps, you might need to perform a deeper analysis.
💡 Tip: When assessing user inputs and comments, look for repeated keywords to help you group responses in specific categories for easier analysis.
Also take advantage of the Chameleon Slack integration, which allows you to send Microsurvey responses to a Slack channel. This can be great to more widely share responses and help your wider team passively hear from users.
(Optional) Step 5: Follow up with surveyed users
The work isn't over after the survey has been completed and analyzed. How are you going to nurture users who participated in it, or open a forum for the feedback conversation to continue?
Following up with users can happen via:
An automatic email set with Customer.io stating the completion of the survey and offering more contact channels and resources.
A call with Customer Success, offered in-app right after survey completion using our Calendly integration.
An in-product resource menu built with Launchers, for users to self-serve possible follow-up actions.
If your beta trial is a success and the product or feature goes to market, you will rely on your beta users to be the early adopters. Nurturing them will let you better harness their engagement towards generating stickiness or growth in adoption.
Conclusion
Launching a new product or feature has many moving parts, but hopefully, this recipe has helped you frame how you can best collect and leverage user feedback for a killer product-led go-to-market strategy.
Continue to explore how Chameleon Microsurveys can help you effectively gather user feedback on our blog.

3 User Feedback Types All SaaS Companies Should be Collecting
How to go beyond NPS to obtain user input that creates a better product.

.png)

