


Enable on-demand onboarding for seamless product adoption
As critical as onboarding is, there isn’t a one-fits-all formula that you can easily apply. But you can apply empathy and goal-oriented efforts to your users’ journey. Create an on-demand onboarding flow that will push users to progress with clear expectations and resources they can access whenever they need them. And most importantly, wherever they need them.
In this recipe, we’ll create a self-serve Onboarding for Trial sign-up users for a note-taking app.
The ingredients for success
Creating a self-serve onboarding checklist with essential resources to get your users to instant moments of value. You'll need:
- A product friction assessment or log
- An up-to-date Help center with articles covering the ‘how to’s’ of your users’ first steps. Intercom and Zendesk are natively integrated with Chameleon, but you can leverage any platform here
- Startup Chameleon account with user properties & events flowing in
Step 1: Identify your product’s friction points
Identify your ‘a-ha’ moment and see how you can bridge the possible blockages that your users will encounter during their first interactions with your product.
Think of the action that creates the biggest impact on how they perceive your products’ value. Ensure any user has a clear way to reach this moment. Keep in mind that they’ll have their own agenda when using your product, so find a way to meet both your goals with subtlety and empathy. 🧚♀️
Address all possible friction points with helpful resources that explain the correct usage and will relieve any possible confusion. You can use detailed articles or quick videos to show users how to achieve specific actions; it’s up to you to pick, but make sure you present the topic clearly and in a way that resonates with your audience.

Friction Log Template
Start logging and uncovering unwanted friction in your product. Get the template straight to your inbox below👇
For specific features, that require a more mature product understanding or advanced knowledge, use all resources you have at hand to cover the subject efficiently. Maybe an article isn’t clear enough and you can also link a case study, or create more emphasis on specific actions. This can make the difference between adoption and blissful ignorance.
Step 2: Create individual Tours to unblock users
For each friction point you identify, ensure your users will be able to overcome them easily. This is the time to use Walkthrough Tours for quick guidance on specific features.
Pick Tours from the Chameleon Dashboard and choose the Walkthrough Tour type. You will link these in your Launcher so users can discover your product at their pace.
Create 1-3 Step Tours to guide users through their first steps inside your product. Remember that you don’t have to hold their hands and point out the obvious, but clear out questions that can cause them to abandon.
A few important moments you can ensure your users can progress through:
Ease of sign-up: use Tooltips to provide extra support to nudge them through more complex processes.
Discoverability of the most important features: simple Tours will help you guide or highlight essential actions. Be aware that these may differ from user to user, so keep a high-level intent and a personal approach to your Tours.
Understanding of long-term benefits: this is a result of them achieving quick value and you demonstrating surprising or expected behaviors. Consistency in how you communicate and support them throughout their journey will help a lot here.
Configure your Tours to provide help in a non-intrusive way. Consider that your norms will not be instantly recognizable by all users, but your product should feel intuitive.
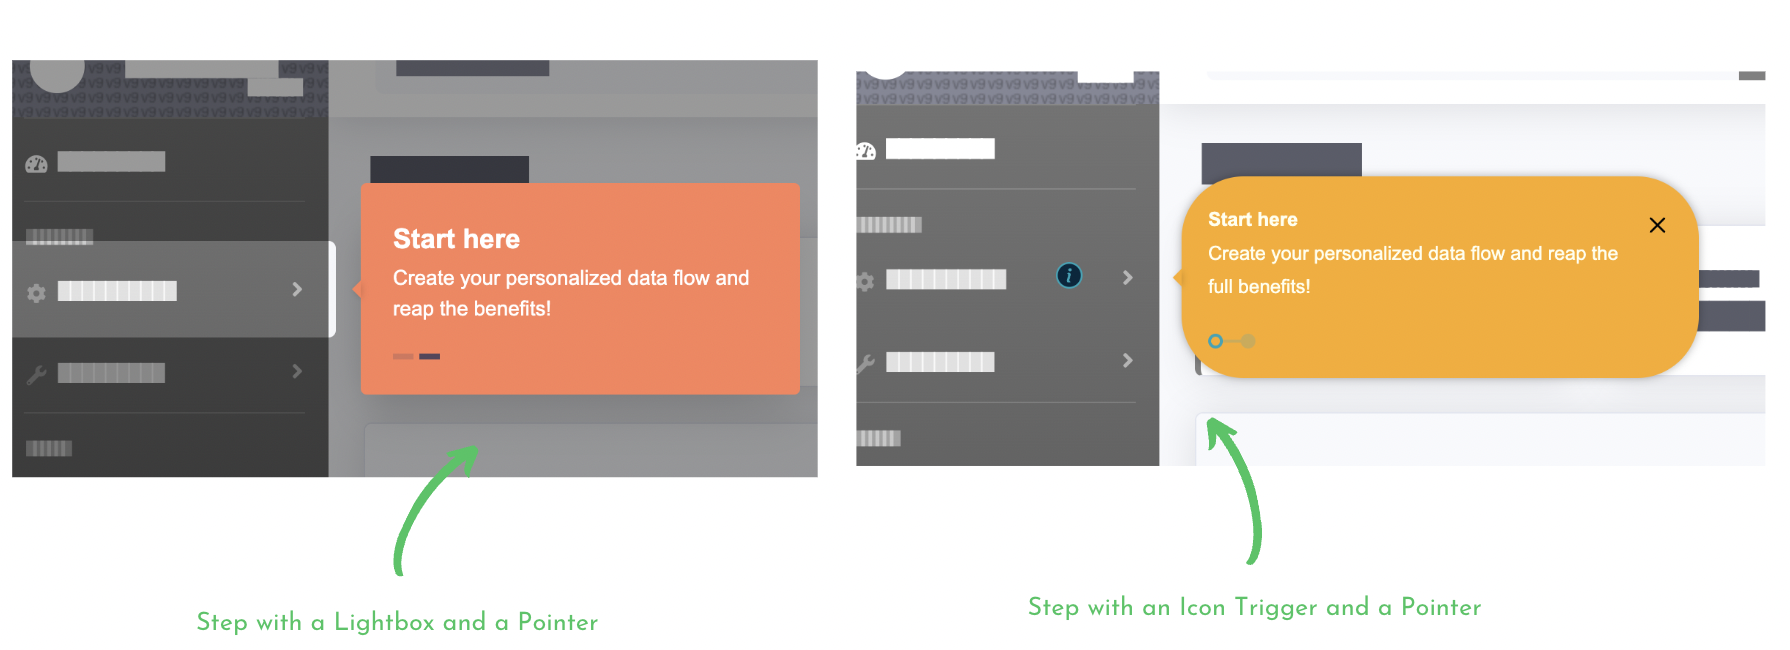
Use Icon Triggers to draw attention to important actions, or Pointers and a Lightbox to transform your Tour Step into a contextual Tooltip.
Use add a Progress bar to indicate how much time they have to invest and how quickly they can accomplish important tasks in your product.
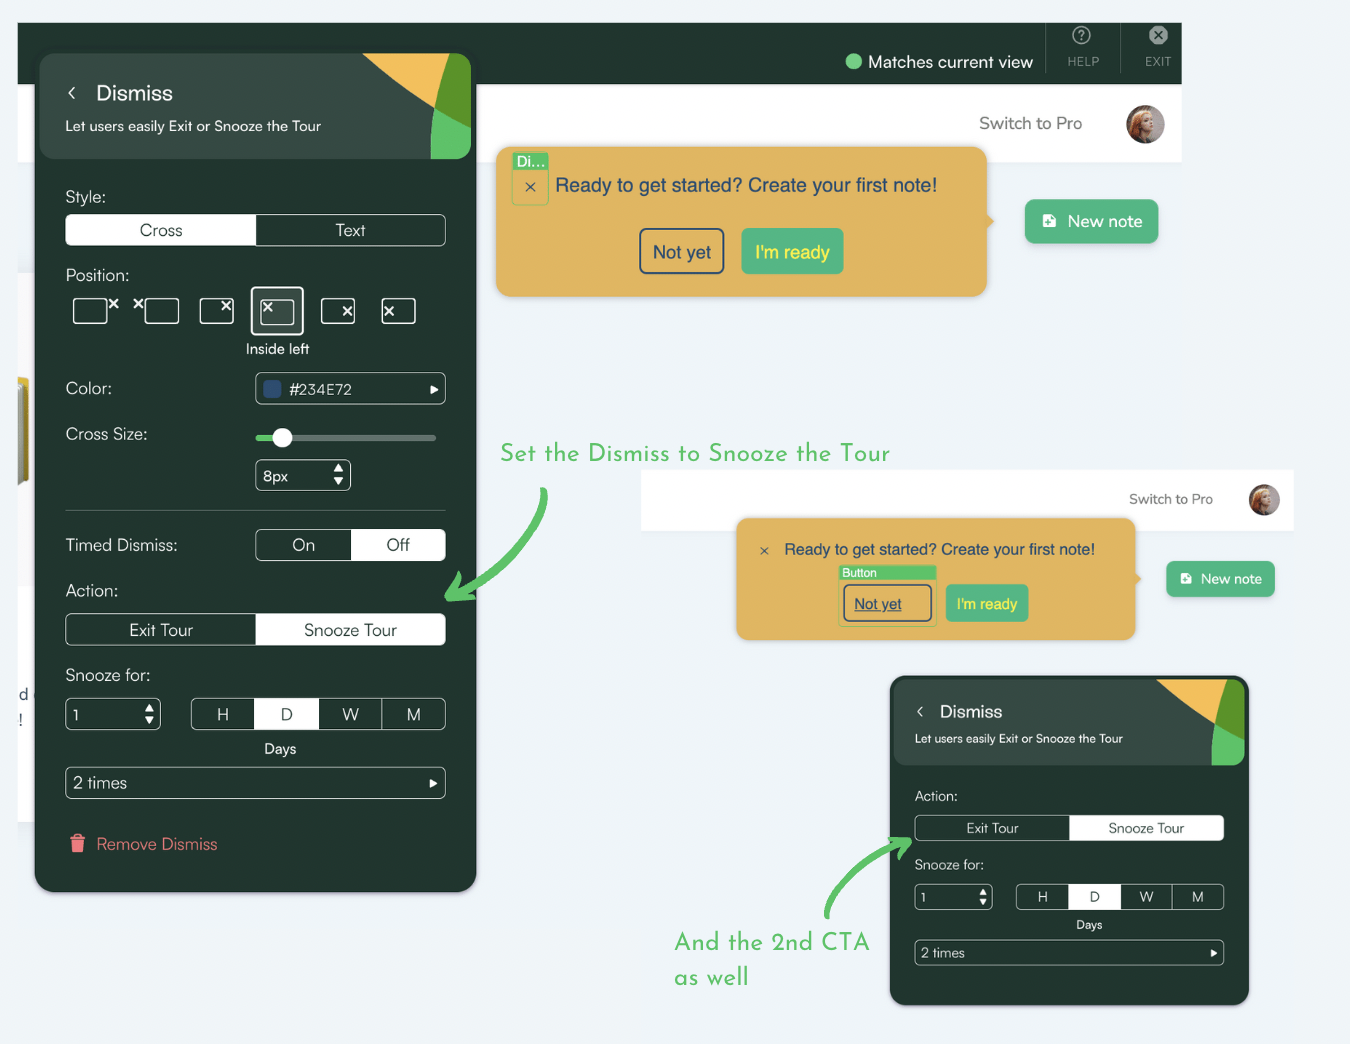
Set a Dismiss option that will snooze the Tour, a secondary CTA button that Dismisses it as well, while the main CTA button completes the Tour. This way, you’ll both have a good day.
💡Tip: For more advanced features, including a GIF to demonstrate the ease of use or a surprising result will make your users want to try it out even more
Step three - Create an audience Segment in Chameleon
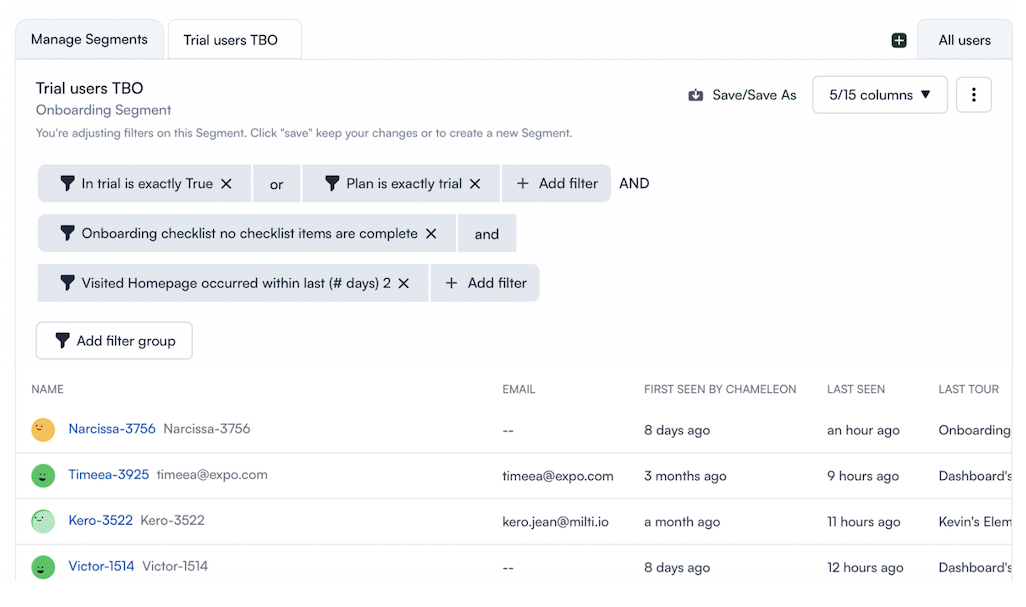
Use your product events and user data to create a personalized onboarding for each user. You can send these via our API or connected integrations. From your Chameleon Dashboard, go to Segments and use these filters, using the “AND” logic operator, to define your Segment:
Depending on your imported properties - use ”In Trial” is true, or "Plan" is trial
Launcher events - your onboarding Launcher with the "no checklist items are complete" option
 If your onboarding requires guidance around more advanced features, leverage the imported events to define a hyper-specific Segment. You can track events like:
Button clicked
Visited a specific page
Form submitted
💡Tip: You can also use Experience Tags to group up Experiences and leverage them as you build your onboarding Segment. They are all available as filters.
Step 4: Create an onboarding Launcher
Pick Launchers from the Chameleon Dashboard and choose the onboarding checklist template. This ensures your users will have a clear understanding and expectations about the steps they have to take to fully enjoy your product.
Add a Welcome and an Empty State to your Launcher.
Under Rules, configure the Welcome state to appear after the page loads. Craft a compelling message to introduce the user to your product and what awaits him next, and use the Personalization option too.
Add a custom widget or pick one provided by Chameleon to indicate the flow you prepare. Add an explanatory and reassuring title; use it to bring attention to the actions users should take to be successful.
Think back to the First Step. What are the crucial actions your users need to make? Link the Tours you created in Step 2, and order them based on the steps your users need to take to discover how great your product is. Link any external resources needed to understand specific features, such as URL items. Use a friendly description for each one, to lay out expectations for your users.
Add a Search component, if you have many items to make it easier for your users to find help, or guidance if they get stuck along the way. Position it at the top of your onboarding checklist.
Under Interactions, click Checklist to create an onboarding checklist, and pick a progress bar to display in your Launcher and widget. This way you’ll drive users to progress by reminding them of the investment they made and how quickly they can reach accomplishment. And help them progress easier, by hiding items once they’ve been completed.
You can leverage custom events to mark the Completion criteria of each onboarding Tour or external guidance, for a clear understanding of your users’ behavior.
A self-serve onboarding can still get users confused, so make sure they can reach you when they feel blocked and want more information. Make sure you allow users to either:
send you a message,
schedule a meeting,
request further help.
💡Tip: You can add a JS code item that will open your third-party chat, such as Intercom, or Zendesk.
Customize the Empty state to let the user know what happens after he’s gone through all the steps in your checklist. This is a good time to prompt special features or guide them further down the funnel.
Step five - Use Microsurveys to improve your onboarding
Make the last step of your checklist a rating Micorsurvey to ask users how smooth their experience was. Asking for their input as they engage with your product will raise the response rate. We’ll be honest, more responses for sure, especially in negative cases. Which hey, this only means you can address their needs better and improve your onboarding Tours. 🙌
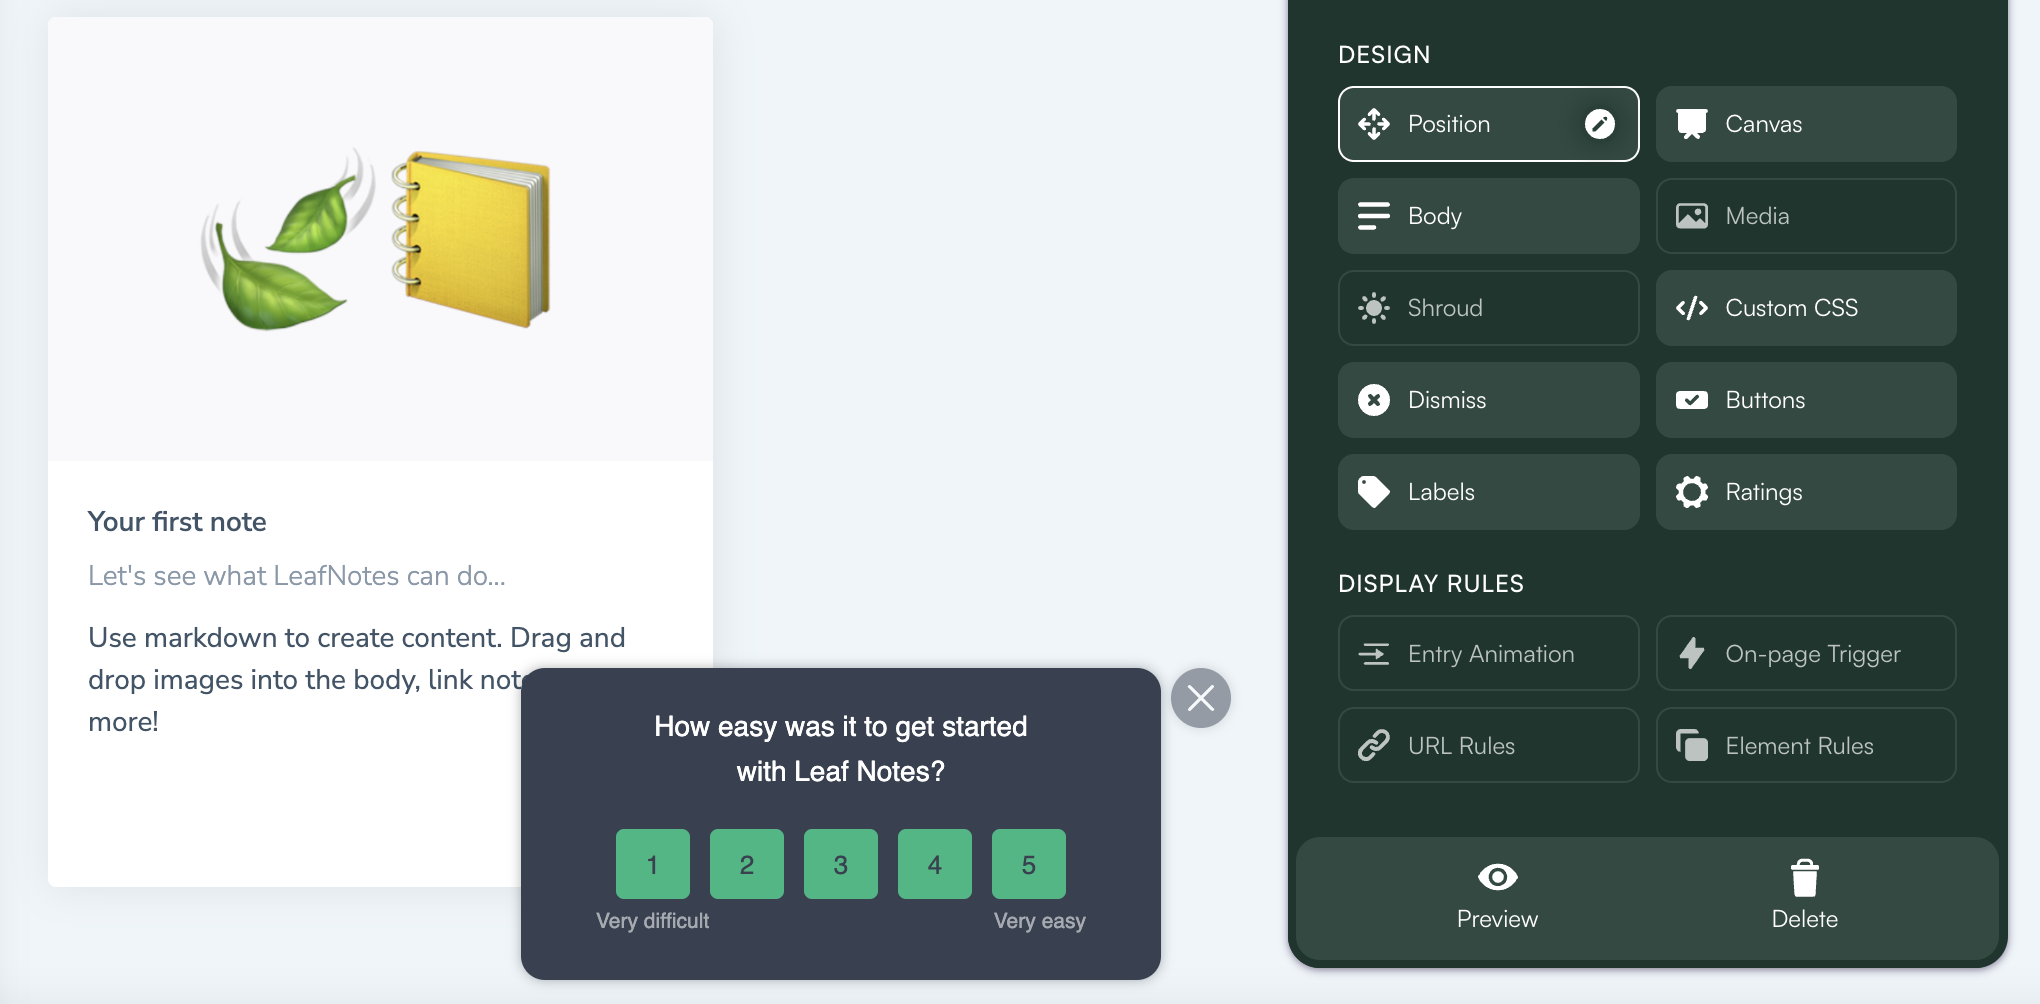
Pick Microsurveys from the Chameleon Dashboard and choose the rating type.
Enter the Builder and add a ‘Comments’ and a ‘Thank you’ Step. You’ll want to hear what they have to say about the rating they give, but also make them feel appreciated for their input.
Pick the Rating type: we suggest numbers or emojis for ease of engagement, but you have several options. Customize the survey labels and copy to fit.
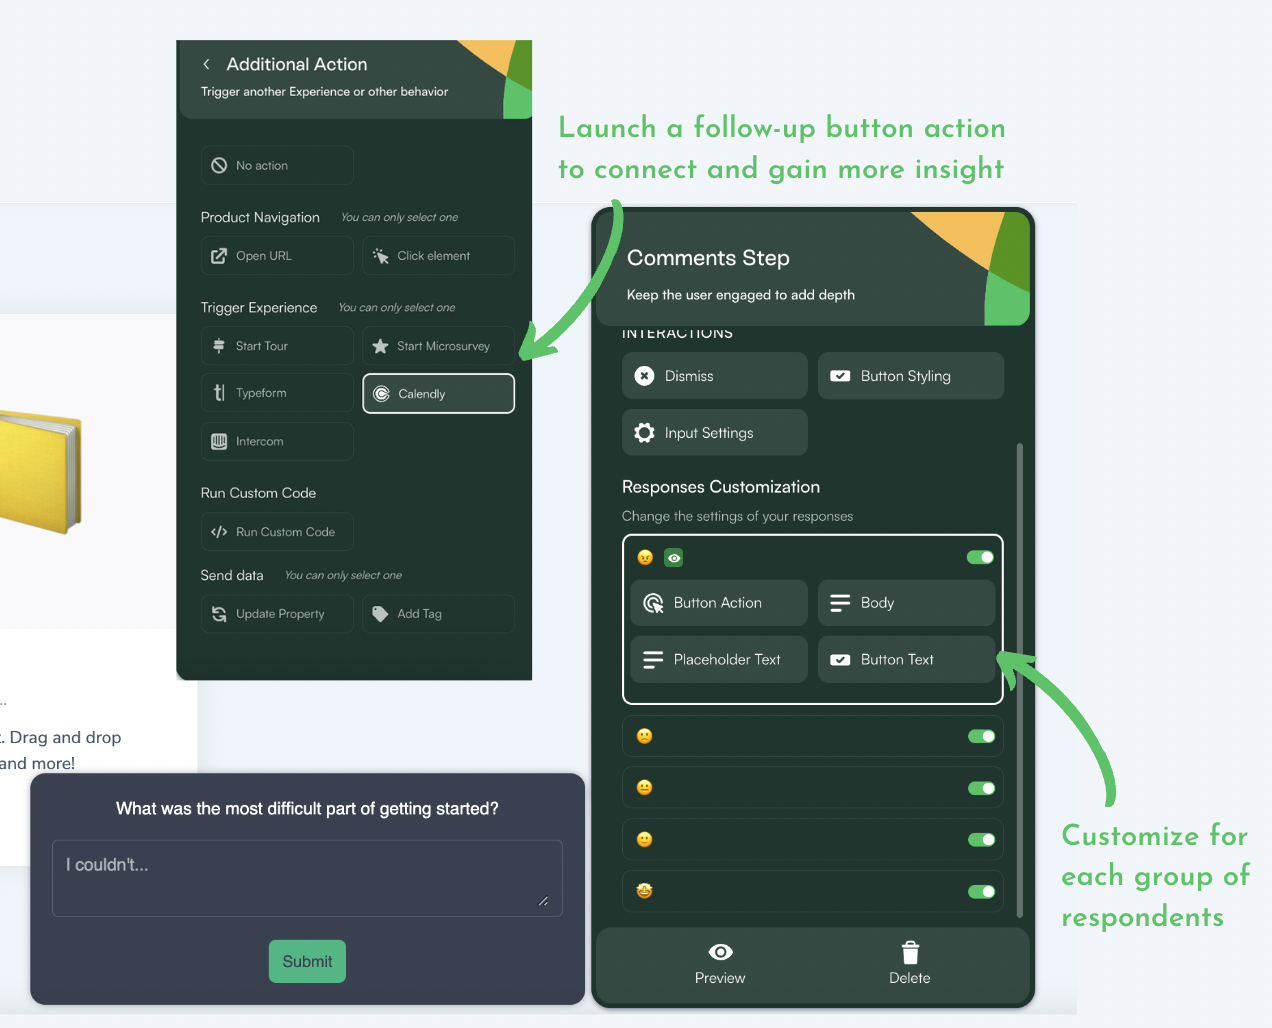
In the ‘Comments Step’ ask them to give more details about their rating. Personalize it for each group of respondents, by asking “why so low” or "why so high” and directing them to the next action with a personalized CTA. Set the button Additional Actions to leverage high ratings for positive reviews and direct low-rating groups to other resources for further guidance
Add a personal thank you message to the last step making users feel appreciated for their time.
Create a second Segment to target users who completed your onboarding Tours:
Use the Chameleon Launcher events filter, select your onboarding checklist Launcher and use the “all checklist items were complete”.
Similarly, create a third Segment to target the users with “no checklist items complete”
To keep crucial feedback in sight and be able to make quick improvements, set your Survey to unpublish after 100-50 responses.
Gather your users’ feedback and see how you can improve your copy, use of triggers, and delivery to better match your users’ expectations and needs.
Optional Step
Gain more visibility for product feedback
Use the Slack Integration to send in Microsurvey responses to a designated Slack channel, where your team can pick it up and re-engage the user further.
From the Integrations page in your Chameleon Dashboard, pick Slack to connect to your Slack account and configure your response feeds.
Use the “Trial”, “Name”, and “account created” properties to attach to your Slack messages, so you’ll know the best ways to connect to your users and their main challenges.
Click the 'Add feed' button, select your live Microsurvey and the Slack channel from the dropdowns to configure your feed.
Connect to the users who submit responses to:
Thank them for their insights and feedback.
Ask for clarifications and see if you can solve their issue.
Schedule a follow-up conversation.
Conclusion
Congrats! You’ve got an on-demand onboarding process that will ensure users get guided when they need it. This way you won’t disrupt their natural discovery process, but ensure you unblock them when they feel lost. Remember that onboarding is a life-long process in a user’s journey and you should always cater past the trial or sign-up phase with the same attention. Check out how to move past getting started, and reduce support tickets with Lacunhers.
