


Get users to adopt any product updates with no friction
Your product matures along with your users. But any change, even a visual one with less functionality impact, can create friction or confusion for users. Turn anxiety into delight with personalized in-app announcements that allow users to discover the changes at their own speed, and understand the benefits. Apply this recipe to develop an internal process for ongoing product updates.
The ingredients for success
Pairing product Tours with email sneak peeks to ensure excitement and adoption with every deployment.
- Startup Chameleon account with user properties & events flowing into Chameleon
- Basic Customer.io account with a campaign-branded template
- Customer.io code snippet installed on the pages where Chameleon Experiences display
- Brand guidelines approved by your designer (optional)
Step 1: Create an audience Segment in Chameleon
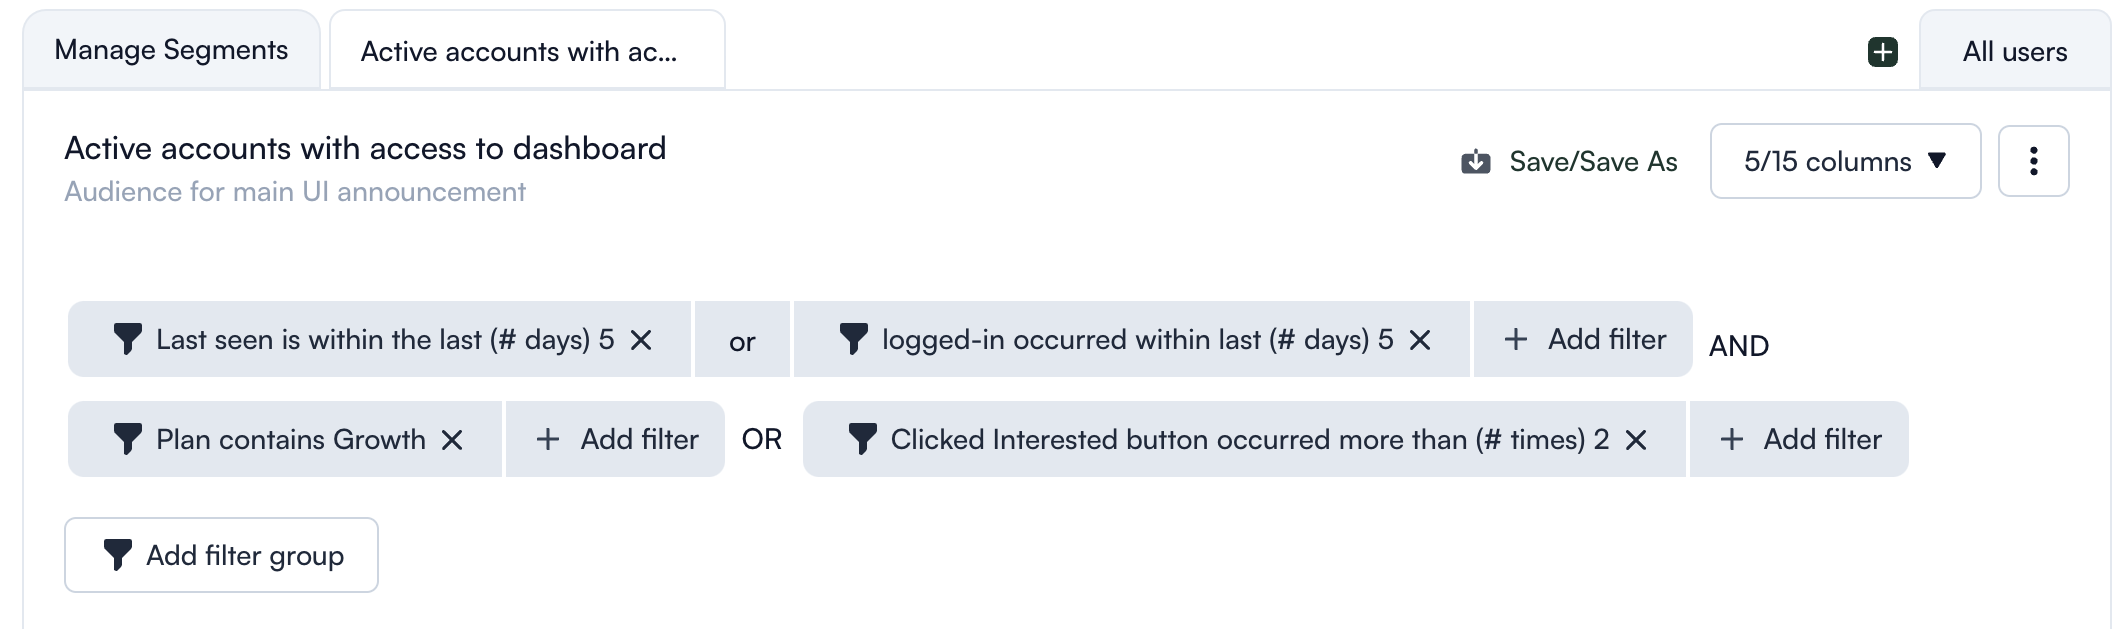
Put your customer data to good use and create a Segment to target your product Tours to. From the Dashboard, go to Segments and use the filters to ensure your Segment contains:
Active users who have sure access to the updates you deploy - use the Chameleon “first seen/ last seen” filters.
Inactive users who can benefit from your updates - add the “account created/sign-up date” to your existing filter group and use the “AND” logic operator. If you use multiple properties to define their activity you can combine them in a separate filter group using the “AND/OR” operators.
Users who interact with specific features (if the updates are directly linked to any) - leverage your product events to target users who engage with features that are going through a change. You can use events such as “button clicked”, “page loaded”, or “form submitted”.
👉 Tip: You can use CSV imports to get your users’ properties in Chameleon if you can’t send that data otherwise (API or connected integration).
Step 2: Create a Chameleon Tour
Pick Tours from the Chameleon Dashboard and choose the Walkthrough Tour type. This allows you to share your Tour via a hyperlink and have it start on demand.
Add 1-3 Steps focusing on the major changes in your product, that can cause confusion or friction. Highlight ‘what’s in it’ for your users and the value that these updates create for them.
💡Tip: If you have more complex updates, create separate shorter Tours to explain the changes in a way that it’s not exhaustive, but contextually discovered and delivered short and to the point.
Use Element and URL rules to configure a highly contextual and non-intrusive positioning for your Tours. Ensure they are directly connected to your users’ behavior and provide extra information about the changes.
Add visuals showing valuable improvements that users can get psyched about! This is the moment to leverage your personality and brand assets to create excitement.
Use the Personalization option from the Builder to include your users’ names or other personal information you can leverage for a unique experience. Add a fallback, for the cases where that’s missing to ensure everyone gets the welcome they deserve!
Step 3: Send out a celebratory email
Use Customer.io to create an announcement email and share the good news.
Create an on-brand template for your campaign, that includes your new style or friendly visuals explaining your updates. This can be a short video taking users through the major changes, or a quick GIF showing a new feature. Get users excited from the subject line, and keep them wanting for more with well-written content and on-point visuals. Don’t fret to personalize your emails as well!
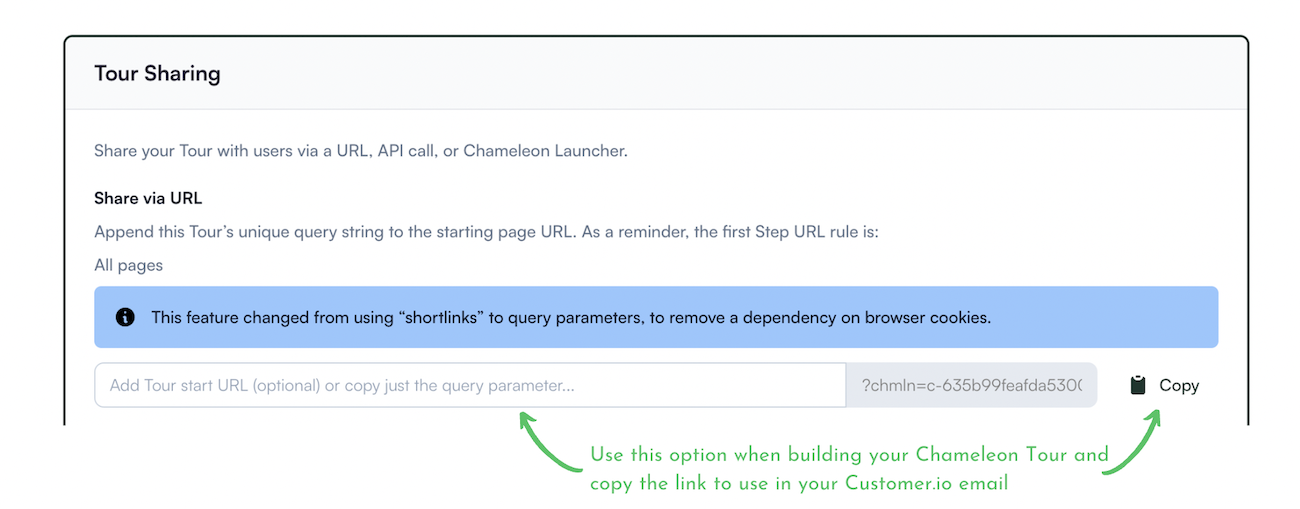
Use the Tour sharing option in Chameleon to allow users to start your Tour directly from your email, whenever they’re ready to explore more. This way, you ensure you don’t disrupt users in your product, but give them time to discover the benefits on their own.
Use Customer.io’s segmentation option to send your email to users who are actively using your product and haven’t engaged with previous sneak peek campaigns.
Schedule it to go live as soon as you have the changes deployed in your product and your Chameleon Tours published live.
💡Tip: Ensure you allow users to share the news on their social channels or with other professionals. If it’s good news it should reach everyone!
Step 4: Create a 2nd Segment in Chameleon
Create another Segment to include everyone who uses your product; mainly to add those who haven’t received your email. Use the filters to include all users who have access to your product - you can leverage custom events such as “visited_homepage” or the “last seen” option from Chameleon.
Step 5: Create an Announcement Tour
Pick Tours from the Chameleon Dashboard and choose the Announcement Tour type that will display to all users. This is how you make sure the good news reaches everyone!
Create a 1-Step Announcement to let users know of the changes and implied benefits. This has the same purpose as the email you send in Step 3: to share the value, create excitement, and allow users to discover the changes.
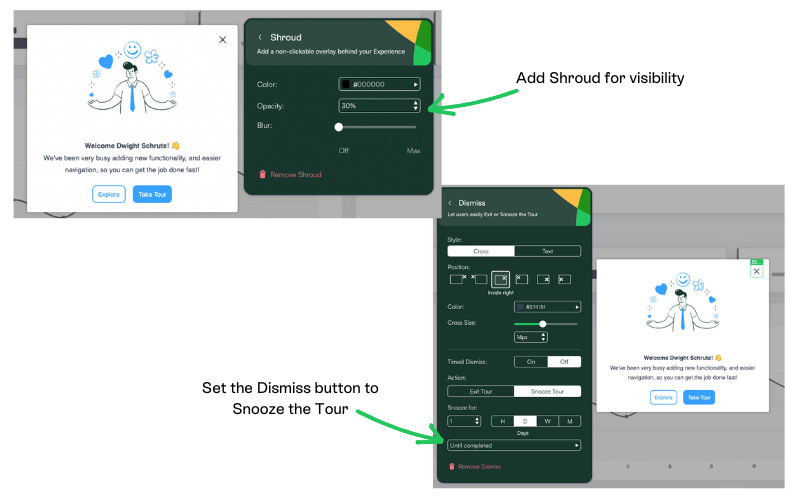
Let your personality shine once more, add an exciting visual, and make use of the Personalization option to catch your users’ attention.
Link your Walkthrough Tour to the main CTA button with Additional Actions, and invite your users to discover the beneficial novelties.
-1671223751.png)
Add a Shroud to mark its importance but also a Dismiss to allow users to re-engage if they're not ready when they first see it. Configure the Dismiss to snooze your Tour 2 times, so the users who are already aware can ignore it (e.g. from your email), and those who aren’t can choose to discover it later.
Pick the Segment you created in Step 5 as the audience; and schedule it to go live as soon as the changes are deployed in your product.
Step 6: Unpublish for maintained guidance
Give all your users plenty of time to become accustomed to the new changes, especially if it’s a UI one. But ensure you unpublish your Chameleon Tours once they are no longer relevant - you can sync with the number of support messages for hard reading.
Leverage the unpublish option in Chameleon if you have a good understanding of your users’ needs, or do it manually based on their behavior post-release.
Step 7: Gather valuable feedback
Use the events from your Chameleon Tours, to trigger Customer.io emails and gain valuable user sentiment as each individual discovers your updates. Just ensure that you are identifying users with the same ID in both Chameleon and Customer.io.
Go to your Customer.io Dashboard, under Activity, and filter by “events” for Chameleon-specific events. Create automated emails for those who:
Exited your Tour: with the scope of reminding them of critical updates
Completed your Tour: to gather feedback on usage and address any other possible confusions.
Optional Steps
Invite users to check out the updates before they're live
Schedule another sneak peek email to go out at least 2-3 weeks before you deploy the changes in your product, so folks can have enough time to get used to the idea and discover your improvements ahead of time.
Send out a sneak peek email with Customer.io that focuses not on words, but on striking visuals. Give your users a reason to get excited and look forward to trying out the new version of your product.
Configure Rate Limiting to ensure critical Experiences gets through to your users no matter what
You may have other Experiences live, such as webinar announcements or how-to explainers. Product updates (such as UI changes) have a higher priority so you want to ensure all users will be aware of them, and not overwhelmed by your communication. This is especially the case with new users, who have more specific journeys and goals. Go to Rate Limiting in the Chameleon Dashboard and:
Create an exclusion for your Announcement Tour (created in Step 5) to ensure all users see it.
Add a Rate Limit for the users you are Onboarding to limit communication to critical product nudges or announcements.
Conclusion
Now you have a steady process set up to announce any product changes or updates, and ensure your users will gladly adopt them. You know how to leverage user attributes and your product events to gain attention and traction around your product changes. Go on and focus on improving your users’ experience with on-demand resources, or understand their needs and challenges better with contextual surveys.
🎥 Webinar: How to launch engaging in-product experiences
Learn how to craft optimal in-product experiences throughout the user journey to increase activation, adoption, and retention.
