


Sync your welcome tours and onboarding emails based on “aha!” moments
With the copious choice of SaaS tools out there, and our limited attention spans while using them, it’s vital your product delivers value to your new users fast, or else they’ll likely not continue using it. Key to this is getting your users to their “aha!” moment before they leave - this is the first time your user recognizes and internalizes the value of your product.
The most successful onboarding programs help users reach their “aha!” moment using a combination of in-app experiences to deliver contextual information when your user first lands in your app, and welcome emails to provide more in-depth resources.
In this recipe, we’ll take you through how to launch coordinated in-app Welcome Tours (using Chameleon) and onboarding emails (using Customer.io) to help your users find value quickly, and remind users of important tasks they haven’t completed, while minimizing noise for those who have.
Before you get started, make sure your onboarding goals are clear, and you know what those “aha!” moments are that you should base your onboarding around. For tips on this, check out this blog article.
Step 1: Set up the Chameleon and Customer.io integration
Head to Integrations in your Chameleon dashboard, find the Customer.io integration, and click “Connect”.
Then click “Enable” to connect the integration - your Chameleon events will now automatically flow into Customer.io.
The Customer.io code needs to be installed on the pages of your product where your users see Chameleon Experiences, and users need to be identified with the same unique ID as they are to Chameleon.
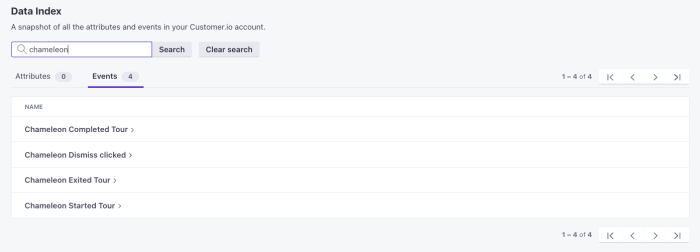
For this recipe, you’ll want to make sure that the following events are flowing from Chameleon to Customer.io:
Chameleon Started Tour
Chameleon Completed Tour
Chameleon Dismissed Tour
Check out our user guide for more info on how to set up the integration.
Step 2: Create your segment of users in Chameleon
Once you’ve defined your “aha!” moments, you’re going to create your Welcome Tour in Chameleon based around these key features in your app.
First, you’re going to create the segment of users to show your Welcome Tour to - users who have just logged into your app for the first time. Head to Segments in your Chameleon Dashboard and then use the filters:
Number of web sessions is exactly 1
First seen by Chameleon is within the last 1 day
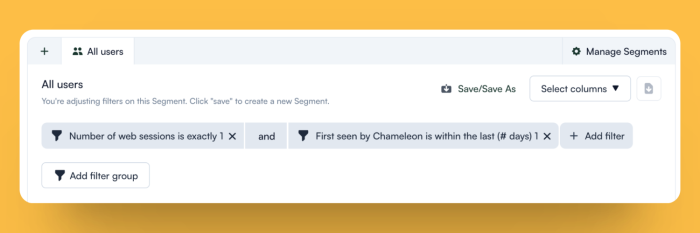
Click Save As, give it a name, e.g. “First-time users”, and click save.
Step 3: Build and launch your Welcome Tour
Now’s the time to get creative in our builder! Tours with 3-4 steps outperform longer Tours for completion rates, so we’ll keep it short and sweet - only highlighting the most important actions for new users.
Head to Tours in your Chameleon Dashboard, hit “Create a Tour”, and choose “Announcement”.
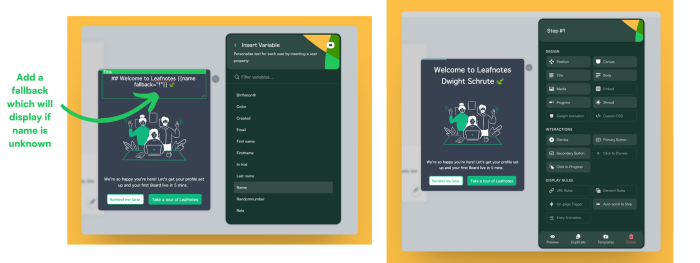
Add a welcome message, an image, and some copy to make them feel valued and encouraged to take the Tour. You can also personalize it by inserting a variable, e.g. their name, and make sure you add text for the fallback, in case name is unknown.
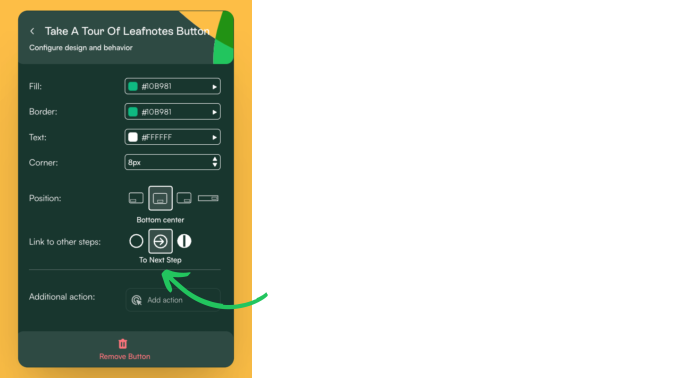
Adjust the primary “Take a tour” button to link to next step.
Adjust the secondary “Remind me later” button to “Dismiss Tour”, and select “Snooze Tour” choosing how long until it displays again and how many times.
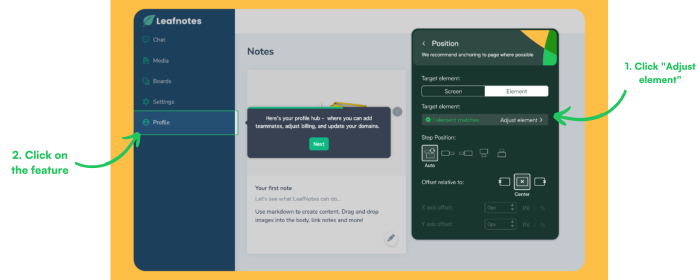
Add a second step to highlight a key feature that you want to give guidance on. Click on “Position”, select “Element”, “Adjust Element”, and select that feature.
Add the option to dismiss, so users can opt to leave if they’re not getting value from the Tour.
Do the same with a third step - at this point you can offer onboarding support with your team, by adding an additional action with the link to book a meeting instantly with one of our meeting scheduler integrations - HubSpot, Chili Piper, or Calendly.
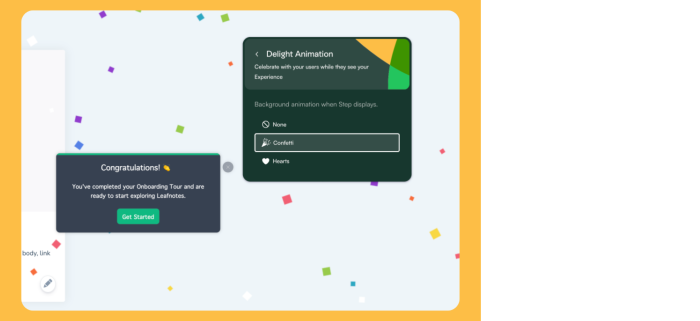
The final step will be a congratulatory message, and you can add a delight animation of confetti or hearts, to get them extra pumped to get started!
Step 4: Trigger Email Onboarding - synced with Product Tour
Onboarding and activation campaigns are most effective when you are utilizing multiple channels. However, you have to ensure these channels are in sync, or else you risk creating confusion.
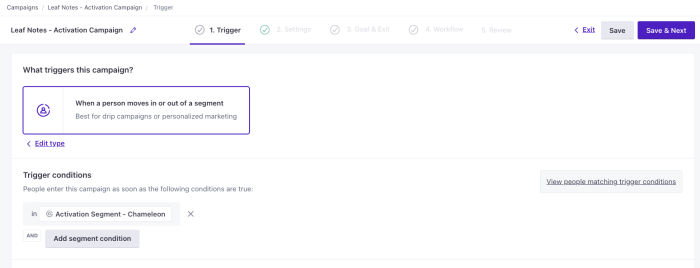
First, create a new campaign in Customer.io triggered by the same segment criteria as you defined earlier for your Chameleon Product Tour.
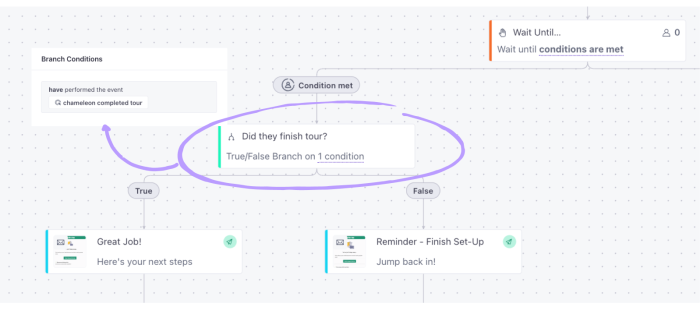
Send your initial welcome email immediately. Then, to align your email campaign with your Chameleon Product Tour, add a Wait Until delay that waits until a user has started their Tour.
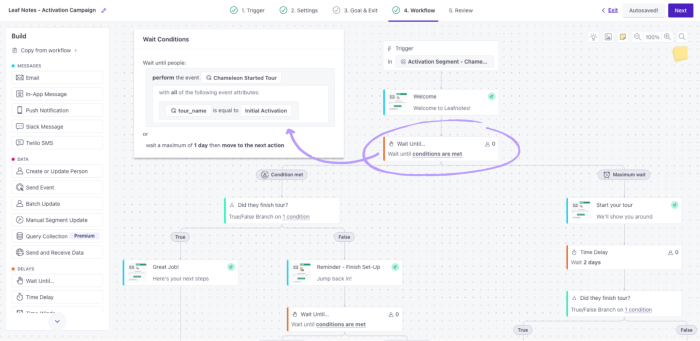
Use True/False branches to add logic to each step, and follow-up with different messages based on whether or not they’ve completed steps in your app or reached their “aha!” moment.
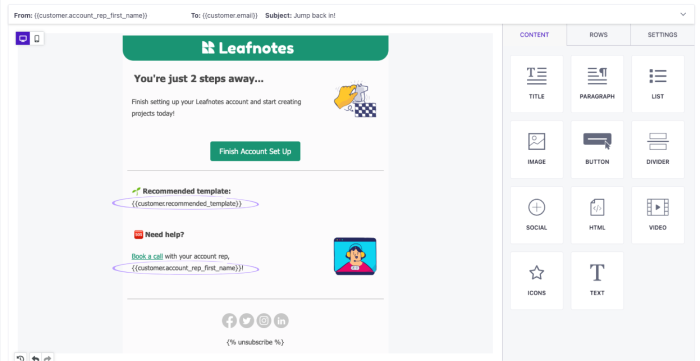
When users fail to make progress, use Liquid personalization in your message to remind them of the things that motivated them to sign-up in the first place and offer personalized support from a team member.
*Note: if you are not currently capturing this type of personalized data, talk to your dev team about adding some!
If a user has completed your Product Tour, and has made great progress towards fully activating in your product, you might not need to send them a barrage of emails to help nurture them forward. Email inboxes are crowded, and consumers unsubscribe when they feel over-messaged.
For this recipe, consider allowing your user to skip to the final email in your sequence if they’ve already completed other key setup steps in your Product Tour.

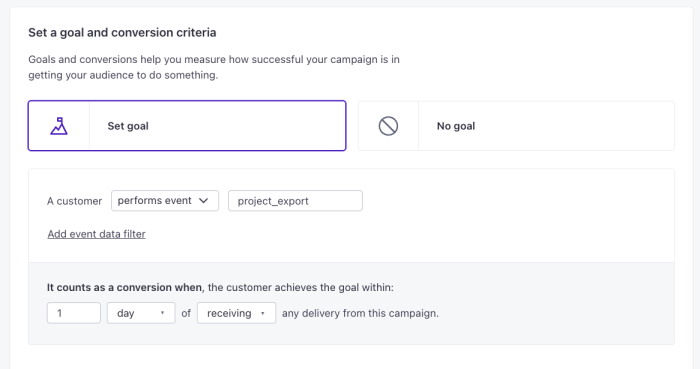
Lastly, don’t forget to set a custom conversion goal. Customer.io allows you to count a successful campaign conversion when a user either completes a desired event or enters a Segment.
Set your activation campaign conversion goal as the "aha!" moment that is most important to your business. In this example, we are counting a conversion if a user exports a project within 1 day of receiving an email in this campaign.
Conclusion
Nice work - you’ve just synced your in-app Welcome Tour and onboarding email campaigns, providing your users with multiple touchpoints across multiple channels during the first few times they use your app, and helping them get to the value they need faster.
Read our next recipe with Customer.io to learn how to coordinate your in-app and email messaging to help increase retention by driving adoption of sticky features, while helping to reduce churn.
Head here for more information about how you can use the Chameleon and Customer.io integration to drive product adoption across the user journey.
