


.png)
How to run a fake door test to gauge feature interest
Validating new product ideas with fake door or painted door tests can help you succeed in getting a new feature to stick. With Chameleon, you can create fake door tests to measure buy-in on new features or ideas, opt users in for beta testing and feature up-selling, and even discover new or update customer cohorts.
In this recipe, we'll show you how to create effective fake door tests with in-product pop-ups and modals, and how to catalyse results using other tools integrated with Chameleon.
The ingredients for success
Creating effective painted door tests involves more than just setting up the fake door and deciding what it leads to. To get through all the steps of creating a test, you will need access to product analytics, user attribute data, and other tools.
A Chameleon account
User properties & events flowing into Chameleon via Segment or our API
Optional: Basic Customer.io account with a campaign branded template (and Customer.io code snipped installed on the pages where Chameleon Experiences display)
Optional: A Google Analytics account
Optional: Brand guidelines approved by your designer
Step 1: Set the goal of your fake door test
What are you testing?
A fake door test serves to gauge how users perceive changes and updates to your product. It can validate a new feature idea before tons of time and resources are invested in it, help you recruit users to run a beta test, update customer cohorts for accurate targeting of product marketing campaigns, and more.
If you're considering using a fake door test, chances are you that you already have an objective in mind. Nonetheless, we're here to make sure you have all your bases covered, so in this first step you'll set up your working station to make this recipe.
First and foremost, ensure that using a fake door is the best way to get the answers you're looking for. This method is most recommended for measuring user sentiment, buy-in, or interest in potential product updates.
Do not use a fake door test to spam or mislead users with information that isn't relevant to them. The goal is not to trick users into signing up or expressing interest in something that might not be valuable for them, but instead, to help you understand what value you can bring to specific user cohorts.
👉 Check out how Buffer and Dropbox used fake door tests to announce product and feature updates.
Step 2: Define your target audience and import or create user segments
Who are you testing with?
The test you're running might not be relevant to your entire audience. Defining which user cohort you're targeting prior to launching your painted door experiment will increase your chances of getting valuable results.
Using a segmented audience will ensure that you're communicating with the users that are most likely to engage with your test. You can send relevant properties and specific events from your product to Chameleon and vice-versa via our API or connected integrations. This means that you can also update user data like properties or attributes based on how users interact with your Chameleon-built experiences (we'll see more of that in a bit).
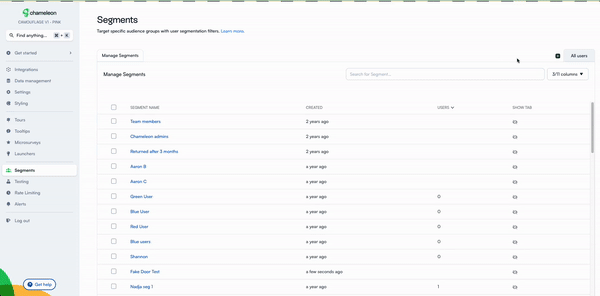
To build or identify your segment for this fake door test, go to the Segments tab from the Dashboard. If you need to create a new segment, click on the ➕icon, name the new segment, and select the filters that will define your audience.
💡 You can also add filters directly to your All users audience and hit the "Save as new" button once you're happy with the result. This will create a new Segment for you.
Will you be targeting customers of a specific plan tier? It’s a great option if you want to test a new premium feature or upsell strategy. Or, will you be targeting potential new customers? This is a good option to build new product marketing cohorts or test your product-market fit.
Any user data you send to Chameleon (properties or events) will be available as segmentation filters, which you can combine to create your custom Segments. You can find more information on which filter groups are available in our Help Center.
Step 3: Create an in-app pop-up or modal with Chameleon Tours
What will your fake door look like?
Once your plan and audiences are ready, it's time to finally create the fake door test. With Chameleon, you can build fake door pop-ups or modals using Tours.
Start building a Tour as you normally would, and choose a title that is easy to refer to in the future.
💡Tip: If you want to ensure a cohesive design that looks native to your product, you can import your own CSS and even build templates beforehand to speed up the creation process.
Configure the content of your Experience and how it should appear on the page; write and format the text, select the positioning and canvas size, include dismiss buttons if needed, etc.
You want to keep your content simple and easy to understand because one of the risks you run with fake door testing is frustrating users who might feel tricked or misled by the messaging. This applies both to the modal or pop-up itself, and to whatever lies behind your painted door (a landing page, another in-app message, a triggered e-mail), but we'll talk more about that in the next step.
You can also determine what conditions need to be met or what action the user needs to perform for your test to appear using on-page triggers.
Under Display Rules on the Builder, you can set the test to be triggered by clicking or hovering on a specific element on the page or from an icon (you can select these from Chameleon's predefined options or upload your own).
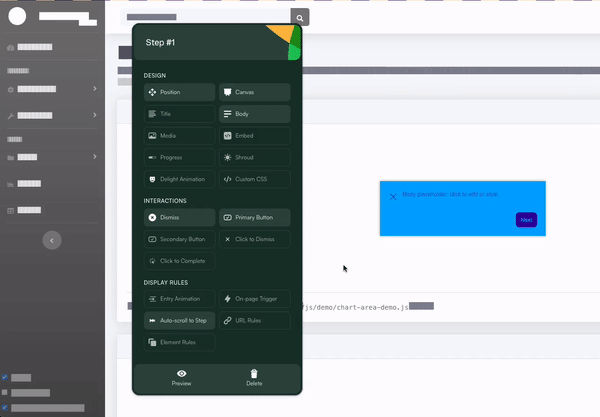
Your fake door test needs a CTA button that will be your main source of data from the test. Under Interactions also on the Builder, set up a Primary Button and even a Secondary one to lead users to what is behind your fake door.
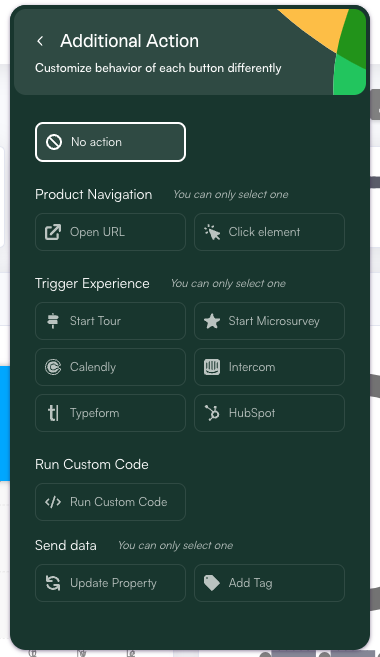
Your CTA could lead users to or trigger:
Another step: open another pop-up or modal.
A URL: open a landing page or any other link.
A Microsurvey: launch Chameleon-built or Typeform surveys.
A custom script: load a different script for certain users.
A Customer.io campaign: follow-up with e-mails set on Customer.io.
We'll get into more detail about each of these in the next step.
Step 4: Set up what actions or elements are triggered in the test
What will lurk behind your fake door test?
Your fake door got a user engaged and they've interacted with your CTA. The destination you lead them to at this point should keep them informed and engaged, and offer you insight into your test results.
As we just covered, there are a few types of on-page triggers you can use to open your fake door.
Let's get into more detail:
Open another pop-up or modal (aka another Tour step)
You can create a second step to the Tour that is hosting your experiment to provide users with further information about what's new or what's changing. In this step, you can also suggest further action with other CTAs.
Open landing page
You can set users to open an URL on another tab with further information or a sign-up form, for example. Sending users to a landing page allows you to combine your test data with Google Analytics, for example, to track page views, bounce rates, session durations, etc.
Trigger or open a survey
If you want to give users an opportunity to express their opinion or give you more contextual feedback on what you're testing, you can set the test CTA to open a Microsurvey also created on Chameleon. In the Microsurvey, you can measure input like their likelihood of activating a feature, reasons for showing interest, or even provide feedback on their experience with the test.
You can also trigger Typeform surveys using the integration.
Open a Typeform-built form
If you want to gather user contact information, you can also use our Typeform integration to direct users to a form to generate lead data or complete a registration process.
Run custom code
If you want to direct users who engage with your test to custom versions, you can run custom code from the button action to load a subpage or new input fields This is particularly interesting for beta testing, if you want to activate beta product directly from the user interaction.
Send e-mail follow-up:
If you want to end the in-product interaction after the first or second step and follow up with users externally, you can trigger an email set with Customer.io to be sent with more information.
Additional Actions: Update user properties
Since Chameleon can also send data to its integrated apps, you can also set your fake door test to update user properties based on user interactions.
For example, if you want to update the attributes of the cohort you're testing to single out the users who express interest in a new feature you're testing for buy-in, you can create a new property and define its values in the builder.
When configuring a button, go on Additional Action
Under Send Data, click on the Update Property option
To choose which user attribute to update, you can choose from existing properties or create a new one
You don't have to worry about matching specific data formats. Chameleon detects it for you and you can easily distinguish between specific user properties.
Set the property values using either static values (such as numbers, text, booleans) or dynamic values such as $now for the current time, or merge tags to pull data from the user or the page.
More information in the Help Center.
After you've completed the set-up of your painted door test, make sure you preview the entire experience to confirm that everything works as you expect.
Exit the builder and let's go back to the Experience Dashboard.
Step 5: Set your publishing rules and launch the test
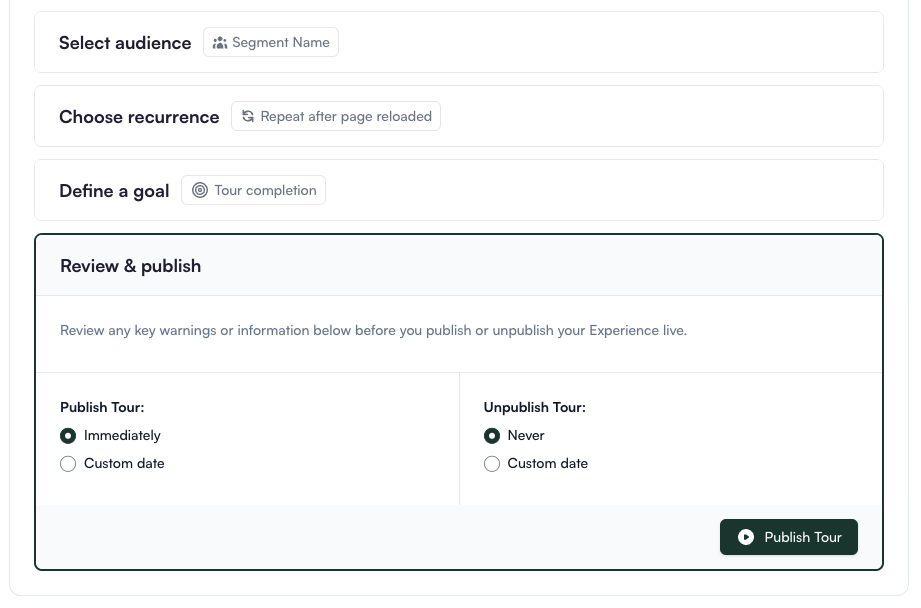
Now that you've built and set up your test, we'll go back to step 2, where we defined the target audience, to set our publishing parameters.
Select Audience: Select the segment you previously identified or created for this test (you can also create one at this step, directly from the Experience Dashboard).
💡At this stage, you can also create a control group A/B between different cohorts, learn more here.
Choose Recurrance: You can determine if the test will repeat after it has been exited or completed.
Define a Goal: Set an event to mark the completion of the test, like if they started a beta test.
Review and Publish: Launch your test immediately or schedule it for a specific date. You can also set the duration of the test by defining an unpublishing date.
Step 6: Evaluate the results of your test
Once your test is running, you can keep up with performance results on the Chameleon Dashboard, like how many users viewed, opened, or completed the test. If it includes a Microsurvey, you can also view the response summary and export it on the Dashboard.
If you are using one or more integrations to send data to and from Chameleon for this Experience, you will also need to pull data from there to fully assess the test.
👥 Segment: Track your cohort data on Segment, including your user attribute updates, and send it to other product and data analytics tools.
📊 Mixpanel: If you set Chameleon to update an event from test completion or update a user property from a click, you can then create reports on Mixpanel to analyze your cohort's behavior.
📈 Google Analytics: Analyze the performance of any web pages leading to or from your fake door test
We hope that by following this recipe, you can build an effective fake door test that doesn't confuse or frustrate users, and that allows you to continue growing your product by learning and offering what users want.
